wip

Adeptus Titanicus arrives!

So, like many of you, we have both been suckered int...dutifully bought the infamous Grand Master Edition of GW's new Adeptus Titanicus range, (Der H -'Did we not have enough to do?) and I couldn't wait to get started, getting a Warlord built on release day...of course it wasn't until 3 days later I realised I'd put the lower legs on back to front...

Airbrush stage finished, onto the nitty gritty...

Airbrush stage finished, onto the nitty gritty...

SAM_0977.JPG

It is definitely easier to paint the armour panels whist still on sprue, especially if you're airbrushing.

SAM_0981.JPG

You will be heartily sick of painting armour trim by the time you finish...

...but once it starts to come together...

...but once it starts to come together...

Starting to put some panels into place...

Starting to put some panels into place...

Slowly, slowly...

Slowly, slowly...

SAM_0988.JPG

And finally a mock-up to check the leg plates all fit as they should...once the lower legs were the right way round...

This one is Legio Praesagius, but I expect to cave in and go full Legio Gryphonicus before too long...glad I got my World Eaters test scheme down though!...


Handro

So you want to build a Storm Eagle...

Short answer - don't.

Long answer...

FW resin, meet my friend Mr. Clamps...

FW resin, meet my friend Mr. Clamps...

Now this is how the Steagle sat on my shelf for nearly a year, which was long enough for the top rear panel to almost nearly not quite fit where it needed to be...Seriously, it was, and still is way out from where it ludicrously claims it ought to physically be able to exist. The fit is so bad, I eventually had to pin both sides of the fuselage to the floor, even after hours of heating and filing. Even then, the front ramp sits in a gap that is too big for it, requiring plasticard and Greenstuff to help out.

Further on....you can see that even the plastic on this kit is bent,  the front 'flap' of the cockpit housing the (absent) Multimelta is lifting away from the hull...You can also see that the resin differs in colour, depending on whether it had…

Further on....you can see that even the plastic on this kit is bent,  the front 'flap' of the cockpit housing the (absent) Multimelta is lifting away from the hull...You can also see that the resin differs in colour, depending on whether it had sat in the sun on my shelf or the darkness of the hobby cupboard for a year...

I had to remove significant amounts of the rears of the top wing parts (where the Greenstuff is in the above pic) just to get them in, the main issue being that the front plastic top panel just wouldn't sit in the right position, consequently shifting all the parts behind it out of position...The engines are pinned into the hull for strength, most of the weight is on the wings and rear of the model (which also causes 'issues' in terms of flying stand stability). Don't forget to pin the landing skids to their legs either, I didn't trust them to hold the weight of the thing alone. Magnetising is an option here.

Pretty much there!

Pretty much there!

Here she is, pretty much done and awaiting undercoat. What a labour of...well, it wasn't love, certainly. Bit of a grind, really!

SAM_0933.JPG
Best of a bad job an' all that...

Best of a bad job an' all that...

Here you can see the WIP 'Greenstuff covered in Liquid Greenstuff' phase of the project. Yeah. It looks better than this now, promise!


Overall, this is a great looking model (remember the brick-like abomination this kit is based on) that is dragged down by horrendous warping and bad fit. Equally it's so rear-heavy extra attention will be required to get it to go safely (and/or semi-permanently) on its flying stand. God-Emperor knows how I'll transport it either. I can't really recommend the kit itself to anyone, never mind the inexperienced modeller, just get a Spartan instead. (Der H: Funny you should mention that...) It does pretty much the same job and is more survivable (on and off the battlefield). However, if you really want, or list restrictions require you to have a flyer transport, you don't have any other option in this price range...in that case, Emperor be with you.


Handro

Handro lives!...

...and therefore builds things!

It begins...

It begins...

Behold! As DerH mentioned, I did indeed pick up both variants of Land Raider Proteus at the FW Open Day, and by some dark magic, have turned them both around from bags of bits to fully built tanks in less than a week. I know, sit down, I've gone light-headed. The reason? Well, we've only gone and signed up for a campaign weekend in December, for which I bravely decided to volunteer my Sons of Horus for. Y'know, that army I've been collecting for the best part of a decade but barely has 1000 points painted. Yeah, that one.

So now I'm looking at completing around 1000 points a month until December, so I gotta build at lightning speed just to keep up my average whilst I'm unlikely to be finishing painting anything in the first month.


SAM_0923.JPG

As you can see above, both tanks have Sons of Horus doors (on a whim, despite me picking up the newer transfer sheet too). I preferred this design to the big round eye one, the chains make it more evil somehow. (Everyone  knows chains = evil, right?)

Such has been the strength of my hobby zeal, a notorious kit that has been lurking on my shelf for nearly a year now has rolled onto the hobby conveyor belt...

SAM_0927.JPG

I don't think there is a single straight panel on this thing...I got lucky with the Land Raiders not being as bad as I feared, but it was all paid back with interest on the Steagle...It's a little further on than in this pic; engine blocks and funny top wing things (DerH - technical term) are on and greenstuffed. On the home stretch hopefully!

Thought for the day: For the Warmaster!

 Handro.

Bolt Action Panzer 38(t) by Warlord Games, A Review

You can find a couple of video unboxings of Warlord Games' recent light tank offering, but none of them actually build the thing!...(Although Warlord Games themselves have ninja'd me last week. Should have posted this earlier!...)

Mighty artwork!

Mighty artwork!

So what do we get in the box?

SAM_0900.JPG

Two sprues (well, one and a half really) in the usual hull, tracks, turret pieces layout.

SAM_0901.JPG

One set of Axis transfers (German, Hungarian, Bulgarian and Romanian) and the modern info card and damage markers. Also included is a nice glossy instruction guide, paint scheme suggestions and transfers guide.


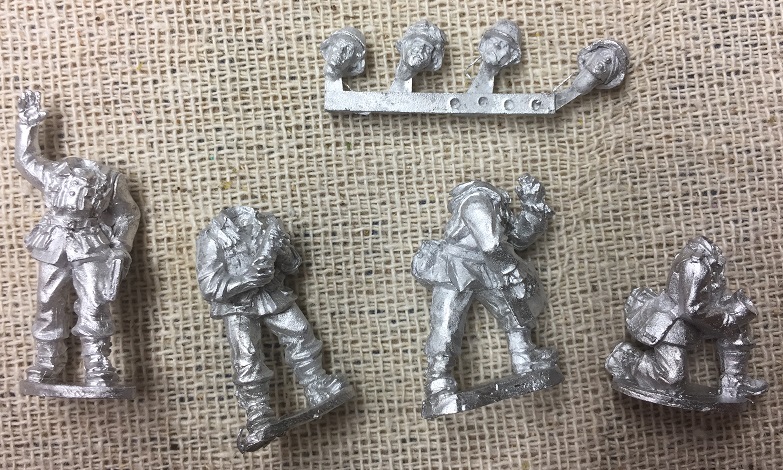
First off, you essentially get the option to build either an 'early'  (Ausf. B/C) or 'late' (Ausf. E/F/G) version, (there are only minor differences, and rules-wise none at all) and the option to remove the hull MG for a platoon commander's tank. (Would probably do for the Recon variant provided in the rules). Equally you get an early-war tank commander with beret and a later version with standard sidecap.

The parts are numbered in the guide but not on the sprue, which causes a little back and forth, but is still technically an improvement from the 'no parts labelling at all, just guess if it looks like the picture' days.

The kit goes together well, taking me about an hour and a half to complete. You can build it quicker but I'm a stickler for every part being cleaned up and dry-fitting before gluing.

Things you might find tricky;

You'll find it easier to build the track assemblies if you put the rear pieces (parts 26 & 27) in first, there's a slot which should ensure you don't go wrong, allowing the adjoining pieces to go in smoothly.

The front hull plate was a pretty tight fit. It'll need a little bit of pressure to pop in, or you may want to insert it before gluing both track sides to the hull.

The rear panel of the turret doesn't sit particularly well until the top plate is fitted, so get that part ready to go at the same time.

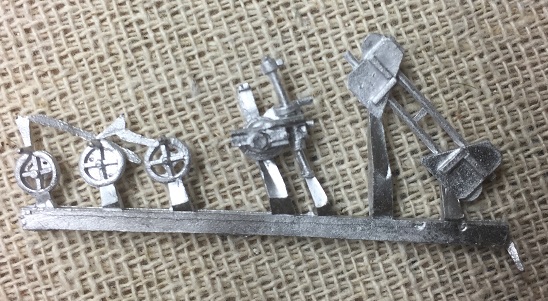
Parts 40 and 41, which sit on the rear hull and are something to do with the running gear are incredibly fiddly to attach. Get your tweezers ready! I have no idea why the weren't simply moulded as part of the hull. I think it might be possible to glue them in before attaching the rear panel but I didn't think of that at the time...

Part 39 (turret handgrab) is tiny and will also require tweezers, as well as careful removable from the sprue.

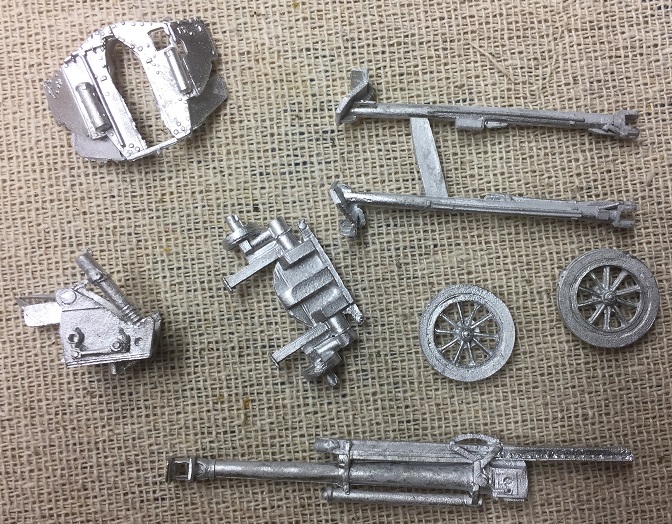
Extras include the signature German jack (placed differently or simply left off all the example models) and a fire extinguisher, of which there is entirely no mention and I can only assume is there for the sprue's other purpose, namely making up part of the Marder kit.

Interestingly (or not...) Warlord always style their kits as being made of 'hard plastic'. I presume that's a technical definition, but I found this kit to be relatively 'soft' - it was very easy to file and clean up in comparison to their infantry sprues and some other makers' plastic.


Ta-dah!

Ta-dah!

She's a dinky little thing, I have a soft spot for many of the boxy early-war, bolted together death traps...here's a size comparison;

For the record, that's a British Sherman V, so infinitesimally longer than a regular one...

For the record, that's a British Sherman V, so infinitesimally longer than a regular one...

SAM_0906.JPG

In summary, this is a straightforward, no hassle tank kit that you should be able to knock together in no time. £18 is the going rate for Warlord's plastic medium tanks, so you might feel a little short-changed to pay the same for a light, but what can you do! If you play early-war you can gain same 'value' by buying the 3 tank platoon, and it's your only option if you want plastic, so what are you waiting for?  Panzer (38t) vor!


Handro


Unboxing - German Heer leFH 18/40 10.5cm howitzer (1943-45)

Behold, more frivolous purchases!

I finally caved in an bought my self a treat....amongst the many other treats!

I've recently met someone who has never watched Band of Brother - who doesnt love Band of Brothers right! As such, it must all be watched again. It doesnt take long to get to the infamous Assault of Brecourt manor with Winters' attack on a fixed gun battery.

In this sequence Easy Company take on a German artillery battery which, although initially thought to be 88mm guns, turns out to be a battery of LeFG 18/40 10.5cm Howitzers.....funnily enough, I know a company who makes those!

WGB-LHR-23-German-Heer-leFH-18-40-Howitzer-1943-1945-01_grande.jpg

Helpfully, Warlord gave many people a voucher recently - under the guise of a survey to see why I havent bought anything recently....needless to say I spent MUCH more than they gave me in discount so they win again!

WGB-LHR-23-German-Heer-leFH-18-40-Howitzer-1943-1945-03_grande.jpg
WGB-LHR-23-German-Heer-leFH-18-40-Howitzer-1943-1945-04_grande.jpg

Its a nice looking kit....I'll take 4! (and two MG42s!)

2018-04-03 17.45.29.jpg

The kit is, currently, unassembled still. This is because larger things are in the works. It does look very tidy. Nice casting as usual from warlord, and the addition of the three equipment, ammo and gear boxes is nice. Once the plans are revealed I will start some assembly and let you know how it goes together!

German_Heer_leFH_18_40_10.5cm_howitzer_1943-45_construction_diagram_db17dc7b-bacf-44ce-9002-a97f93239ed9_grande.jpg

Did someone say shame?

Shame.gif

The O-Word

That's Orks, obviously...

Everything's better with tracks!

Everything's better with tracks!

...what did you think I meant?

So it's a bit of a long-running joke here on the blog that we don't mention my Orks, but no longer! Consider 2018 a Xenos-friendly year! 

Cobbled together rear suspension/drivetrain...dead orky! (And composed mainly of tears and swearing!)

Cobbled together rear suspension/drivetrain...dead orky! (And composed mainly of tears and swearing!)

Orks are just made for kitbashing and converting, this is just a teaser of the orky goodness I hope to deliver!

Handro


Thought for the day'Green iz best!'


Der H's T-34-88 (or not...)

Today I am going to pontificate upon a conversion I am planning with my new T-34/ZP. The idea for this conversion came from the World of Tanks T-34-88 - a lovely little beasty that I run regularly!

2017-08-29 22.06.47.jpg

There are several interpretations and accounts of various tanks (on all sides) using captured equipment in WWII. One of these is the account of T-34/85 sporting an 8.8cm gun from theTiger I. tanks-encyclopedia think this unlikely:

"The T-34/85 turret is hardly a likely candidate for holding such a long, heavy gun. It would probably cause the suspension serious problems – it is widely known that the attempts by the Soviet to fit a 100mm gun to the T-34/85 caused the suspension to buckle and break during firing. Secondly, there would have to be extensive and incredibly precise engineering in order to actually fit the huge gun in the T-34’s gun mount (and being able to give it any elevation or depression), something probably not available to any units outside of heavy factories of Germany. Thirdly, the gun itself was huge and complicated. In fact, the KwK 36 L/56 took up most of the internal space for the Tiger I turret. It is extremely unlikely that there would be internal space in a T-34/85 turret in which to accommodate such a large gun."

T-34-mit-88-tiger-gun1.jpg

What ever the truth, It is very pretty, and in game terms would look good as a command tank in Bolt Action's Tank War supplement. To this end, when Warlord had their sale, I decided to buy a few bits!

wgb-ri-500-t34-85-d_grande.jpeg

The standard T-34/85 plastic kit (a thing of beauty!) comes with most of the parts needed including the hull, fuel tanks, storage box, turret and cupola seen on the T-34-88. The main changes will be the gun and the bustle. The gun had two main options; the Tiger 1 8.8cm (as in the story) or the smaller but similar looking PzIV gun from the PzIV H.

WGB-WM-508-Tiger-IE-e_grande.jpg
WGB-WM-505-Panzer-IV-H-a_b637fe7d-6db5-4052-a8d1-21329f86c634_grande.jpg

The Tiger I gun is larger (of course) and has three thicknesses, the Pz IV H gun has a similar muzzle break, but less of a step down.

WGB-WM-505-Panzer-IV-F2-G-m_grande.jpg

The ammo box on the back of the turret of the T-34-88 is very similar to the Pz IV H turret box. HOWEVER, the other reason for buying the Pz IV is to force my good buddy Handro to make the PzV/IV aka Rammpanzer (hull of a panther with turret from a Pz IV). The ammo box is pretty vital for that plan!

The box on the T-34-88 could be made from scratch, and so I will try this before destroying Handro's Pz IV dreams!

I'll hopefully get this done this week and get some pictures up soon!

Der H

Project Update - Lord Commander Eidolon

I actually got some more painting done yesterday!

Naturally Lyro (my smaller cat) wanted company so we had to sit and paint together.

2017-08-26 17.51.50.jpg

I got some more paint on Eidolon. Still a long way to go but I've almost blocked out the colours.

2017-08-26 18.14.40.jpg

Ive gone for a pretty standard theme. Gold trim is a pain - or rather it was until I opened my new gold and suddenly it worked - still have some tidying up to do before washes/highlights etc.

2017-08-26 18.14.57.jpg

Ive gone for a black pad on the right. It will have silver studs on the gold rim and the III symbol. Laurels will be white to tie in with the laurels on his chest and his hair.

What do you guys think? Im hoping to get this finished tomorrow so look out for an update then!

Der H